Model Builder October 1987 - Lester Garber
Building Indoor Peanuts

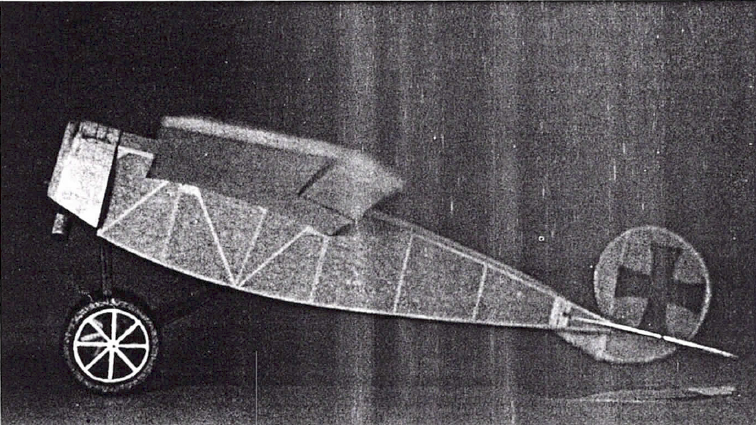
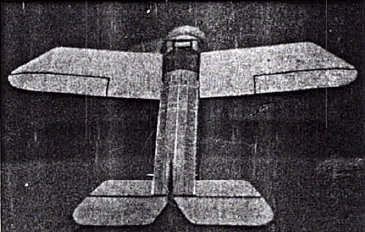
Model of 1918 Hergt Monoplane design by Walt Mooney serves as the author's example for this article. Remember: light peanuts are easier to adjust, fly longer, and don't break as easy!
1. Selecting a design
Selecting a good design is usually a compromise between scale points and flying characteristics. The best compromise is to select a good flying design, build the model as light as possible, and add as much scale detail as possible. Study the rules carefully!A good flying Peanut design should have a broad wing chord (2.5 inches or more), length about equal to span, large stab, and a long nose moment.The Lacey and Fike are classic examples of designs with these features. It is possible to build the Lacey to 4 grams and have flights of 3 minutes.However, the Lacey and Fike typically do not do well with respect to scale points. Several monoplane designs from pre-1935 are good flying designs and will score higher scale points.
2. What is a light peanut?
It is not unusual for Peanuts to weigh 8 to 15 grams. I consider a Peanut to be light if it is a good flying design, has good scale detail, and weighs less than 5 grams.A design with a narrow wing chord, small fuselage, and weighing 4 grams is NOT a light Peanut; it is a SMALL Peanut. High aspect ratios (narrow wing chords) are undesirable because of the 13 inch span limitation. In other words, narrow wing chords result in small wing areas and higher wing loadings. This reduces flight times.
3. Why build light peanuts?
Three answers can be given to this question:
1.Light Peanuts fly longer.
2.Light Peanuts are easier to adjust.
3.Light Peanuts don't break when they hit the wall.
With respect to the first point: A simple energy analysis shows that flight time is inversely proportional to weight to the 3/2 power. This means, for example, that decreasing the weight by 50% should increase the flight time by 84%. Decreasing the weight by 25% should increase the flight time by 40%. Weight is ever so critical !
With respect to the second point: Light Peanuts require less power and fly at a lower speed. In other words, the forces (torque and aerodynamic forces) acting on the model are smaller. Since the model flies at a lower speed, the effects of small warps, drag, and other imperfections will be less. Light Peanuts will also recover from stalls and other disturbances more quickly because of momentum considerations. The model will be less sensitive to thrust and other trim adjustments.
With respect to the third point: Aerodynamic considerations show that lift is proportional to velocity squared. To generate twice the lift, the model must fly 1.41 times the original velocity.
In level flight, lift equals weight, therefore doubling the weight means the model must fly 1.41 times as fast!!When a Peanut hits the wall, whether or not it breaks depends on its structural strength and the amount of kinetic energy it has when it hits. The structure must absorb the kinetic energy by bending and/or breaking.
Kinetic energy is proportional to velocity squared. If the model is flying 1.41 as fast, it possesses twice as much kinetic energy! The bottom line is this; a model having ki the weight will fly at 71% the velocity and will possess 25% the kinetic energy when it hits the wall. Therefore, light Peanuts are much less likely to break.

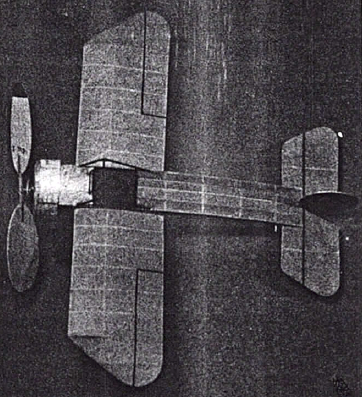
The upper surface of each wing on the Peanut Scale Hergt was covered with three pieces of tissue to accomodate wing's compound curves.
4. How to build light peanuts
In the following comments, I will use as an example a 1918 Hergt monoplane design from Walt Mooney. This is a good flying design; 13” span, 2.85” chord, 11” inch fuselage length, 1.7” inch nose moment. The Hergt has spoked wheels, some rigging, and a nine cylinder radial engine for scale detail. My finished model weighs 4.75 grams and makes flights in excess of two minutes.To build light Peanuts with sufficient strength requires Burt Rutan's construction criterion:
"Check every piece for lightness by throwing it up in the air. If it comes down, it's too heavy!"
Lightness and strength considerations should be applied to EVERY piece. Making one small piece half as heavy will not reduce the weight by much, but making every piece half as heavy will result in a light Peanut.Construction methods should be based on lightness and strength considerations, not on building time. In other words, if it takes you twice as long to build a component that is half as heavy, do it. The Hergt required 52 hours of construction time.I find the following tools to be very useful:
1. Scale for accurate weighing to .001 grams.
2. Wood stripper for making all strip stock.
3. Notebook for recording weights and other construction data (a valuable learning tool).
4. Carbon steel razor blades for clean cuts.
5. Tweezers made of bamboo to hold small parts without crushing the wood.
For cement I use Duco cement thinned with three parts acetone. A syringe with a .010 ID needle is used to apply cement.The balsa I use is indoor wood. The cost of materials for peanuts is minor relative to the amount of building time. Therefore always use the best available materials.
| Components | Ready to cover (g) | Covered (g) |
|---|---|---|
| Fuselage frame | 0.528 | 0.875 |
| 9 cylinder radial engine and cowl | 0.710 | 0.710 |
| Prop and nose plug | 0.970 | 0.970 |
| Wheels (2) | 0.272 | 0.272 |
| Undercarriage (3 pieces) | 0.177 | 0.177 |
| Wing frames (left and right) | 0.423 | 0.913 |
| Stab frame | 0.065 | 0.242 |
| Fin frame | 0.024 | 0.107 |
| Total | 3.169 | 4.266 |
| Misc. Detail | 0.484 | |
| Finished weight (ready to fly) | 4.750 |
Total paper weight: 1.019 gm
Weight of dope applied to frames to adhere paper: 0.131 gm.
These measurements can be considered typical for a light peanut.
Fuselage longerons and cross pieces were cut from 7 lb/ft3 balsa. With the exception of stab and fin frames and other non-load bearing pieces, using 4 or 5 lb/ft3 wood for strip stock is false economy because of low-strengths. The longerons and front cross pieces were .040 square. Remaining cross pieces were .040 by .030. The turtledeck was constructed with 5 lb/ft3 strips (.025 sqr. Additional diagonals were added near the front). Some 30 small gussets (5 lb/ft3 .020 sheet) were added at all stress points.
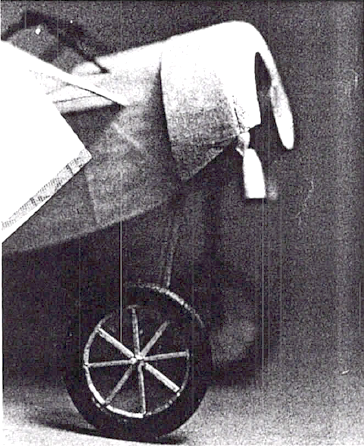
Considerable weight can be saved during the construction of scale details. Plastic is quite dense relative to balsa and styrofoam. Do not use plastic wheels and engine cylinders, they are too heavy for indoor Peanuts. The spoked wheels on the Hergt were constructed from foam and balsa with small brass hubs (.025 OD, .015 ID, .075 long). The engine cylinders are tubes rolled from .012 inch balsa. Paint (dope, etc.) is heavy, felt tip pens can be used to color most details.

Spoked wheels on Hergt were made of foam and balsa with small brass hubs. Engine cylinders are tubes rolled from thin balsa.
Sliced ribs (5 lb/ft3, .022 X .030) were used in the wings. The LE and TE were 7 lb/ft3 .040 sq and .040 X .030 respectively. A single wing spar (5 lb/ft3, .020 X .093) was located between the sliced ribs. Diagonals (5 lb/ft3, .025 sq) were located between the LE and spar for additional LE strength. Wing tips were formed from .025 X .030 bamboo.
Stab and fin frames do not need much strength and can be constructed from 5 lb/ft3 .040 X .025 strips. Keeping the tail light cannot be over-emphasized. Adding weight to the nose is a poor solution for an overweight tail. If the tail is too heavy, make a new tail and, if necessary, rebuild the fuselage. If the tail is 0.10 gm heavy, you will typically have to add 0.40 gm to the nose -- now you've added an additional 0.50 gm to the model!!
5. Covering light peanut scale models
The typical procedure used to cover a Peanut is this:
1. Cover the model attaching tissue with some type ofadhesive.
2. Spray the model with water or alcohol and hope that itdoesn't warp too badly!
3. Apply one or two coats of thin dope again hoping thatthe model doesn't warp too badly!
It is very exasperating to spend 40 hours building and then have the model turn into a pretzel while being covered! Gerry Wagner of Southington, CT gave me the following method for covering light Peanuts. It is vastly superior to the above method. Prepare the tissue by the following procedure:
1. Make an 18 X 24 inch rectangular frame from pine strips 3/8 X 3/4 inch or larger. The frame must be strong to prevent twisting as the tissue shrinks.
2. Paint the frame with two coats of thick dope.
3 On a HUMID day, tape an 18 X 24 inch sheet of tissue tothe frame. Try to minimize wrinkles. Use small pieces of masking tape.
4. Using a brush and acetone, brush the tissue around theframe to dissolve dope and adhere the tissue to the frame. Try to minimize wrinkles. The tissue must be firmly attached to the frame at every point.Using a spray bottle (Windex, etc.) and water, spray the tissue and let it dry. The tissue will shrink, removing all wrinkles, and become tight as a drum on the rigid frame.
6. Repeat step 5 at least 10 times over one or two weeks.
7. Leave tissue on frame until you are ready to cover.
The type of tissue is very important. From a weight point of . view, the difference between light and heavy Japanese tissue can be as much as 50%. Such weight differences can only be detected by weighing sheets of tissue with a good scale, they cannot be "sensed" or "felt". On the Hergt, the total tissue weight on all surfaces was 1.019 grams.
To cover the model, use the following procedure:
1. On all frames, make sure there are no bumps or other protrusions that will prevent the tissue from laying flat against the frame. Sand if necessary.
2. Using dope thinned 50% and a small brush, brush one coat of dope on the frames. Apply dope only where tissue will touch and use as little dope as possible. This will add between .1 and .2 gms to the model.
3. On the day you cover the model, be sure that the humidity is VERY LOW. This is very important, if you cover the model on a high humidity day, later when the humidity is low, the model will warp.
4. Cut pieces of tissue from the frame to match the model frames being covered. The tissue pieces should overlap the model frames by no more than 1/8 inch. A sharp carbon steel razor blade works best to cut tissue. Be very careful that you do not wrinkle the pieces of tissue during the cutting and fitting.
5. Remember that tissue must wrinkle if it is curved in two directions (compound curves). No single piece of tissue should have to follow a large compound curve. if necessary, cover a particular frame with two or more smaller pieces. For example, on the Hergt the upper surface of each wing was covered with three pieces of tissue to accommodate compound curves at the wing tips.
6. Lay pieces of tissue on model frames. They should lay flat against the frame at all points with no wrinkles. There should be no more_than 1/8 inch overlap at any point, if necessary trim tissue. If the tissue doesn't lay perfectly flat against the frame at all points, don't try to force it, that never works. Try to understand why it doesn't conform to the frame. Perhaps it should be covered with two or more smaller pieces instead of one larger piece. Remember, you cannot force the tissue to fit a frame. When laid on the frame, it should fall into place.
7. When the tissue matches the frame, dip a small brush into acetone and carefully touch the tissue at several points on the frame. The acetone will soak through the tissue, dissolve the dope on the frame, and adhere the tissue to the frame. Continue to do this until the tissue is attached at all points. Let dry and trim with a sharp carbon steel razor. Continue this procedure until all frames are covered.
8. At this point, all frames are nicely covered. The tissue is wrinkle free but not tight and that's the way it should be. Do not do anything else. Do not spray the covered frames with water or alcohol, that will only cause wrinkles. Do not dope the tissue, it is not necessary, adds great amounts of weight (as much as 1 gm with two coats) and may cause warps.
9. Aileron outlines and other trim should be cut from colored tissue that is pre-doped. Position trim on covered frames and attach with acetone. If you try to directly dope trim to the frame tissue, it will cause wrinkles.
Models covered by this method will not warp. On a very humid day they may develop some wrinkles but that is never a serious problem. Because this method results in warp-free structures, the model will perform consistently. I have a Lacey M10 built and covered by these methods three years ago. The model weighs 4.5 gms and has flown for 2 minutes and 55 seconds. Flying trim has not changed significantly since the model was first trimmed.

Finished model weighed 4.75 grams and makes flights of more than two minutes.
6. Flying light peanuts
Trimming peanuts is a whole other subject. If the model is light, warp free, and not tail heavy (properly balanced) it should be relatively easy to trim.
In general, I try to make my models fly against torque (to the right) because I want the circle to tighten as power decreases. This prevents diving under the initial power burst and stalling during the latter part of the flight. Right and down thrust are built into my models with a bit (1/16 inch) of washout in the right wing. The decalage and CG location should be adjusted so that the model is not pitch sensitive.
As with all indoor models, Peanuts should be trimmed to fly close to the stall speed. When the model stalls, the wing on the inside of the turn should stall first. This causes the model to fall into the turn which quickens recovery and prevents wandering.
Experiment with propeller shapes, diameters, and pitches. Do not use plastic propellers, they are too heavy. I use balsa (5-6 lb/ft3) blades that are warped on a carved pitch block. The warped blades are glued to bamboo pegs and plugged into a hub made of plastic tubing (Bic ball point pen ink tube). The blades can be twisted at the hub to vary pitch. I use props that are 6 to 7 inches diameter and have blades that are about 1 inch wide. Prop blades wider than 1 inch do not work well because they present too much frontal drag.
After spending 50 hours building a masterpiece, nothing is more depressing than to have a motor explode and destroy your creation. Design a GOOD winding tube for your model and use it EVERY time.
Take good notes while flying, measure the weight and lengths of motors. After each flying session, study these notes.
7. Closing comments
Professionally I am an engineer and building and flying model airplanes is a microcosm of engineering. The best general advice I can give is to measure things (weights, time, strengths, etc.), take good notes while building and flying, make rational experiments, study what you and others have done so that you can improve in the future.
Some will, disagree with many of my statements. I build Peanuts that are first of all light and fly well. Others prefer to emphasize scale considerations and are less concerned about weight. (I have seen many excessively heavy masterpieces explode as they hit the wall at a terrific rate of speed!)
A fool learns from his own mistakes while a wise man learns from the mistakes of others. This fool has learned much from others and makes no claims of originality for all the techniques described herein. Nor does he claim that these are the only correct techniques. In the end there are no great secrets and most modelers are enthusiastic about sharing their knowledge and experiences. That is the way it should be and that is why we are a close group.
Lester W. Garber PhD
159 Hillside Avenue
Providence, RI 02906