Popular Mechanics - p. 1043 - juin 1929 - Hi Sibley
Better Wings for Model Planes
A COMMON defect in practically all model airplanes is the tendency of the wing fabric or paper to sag between the ribs. Besides being detrimental to the appearance of the wing, this loss of smooth contour lessens the lifting power.
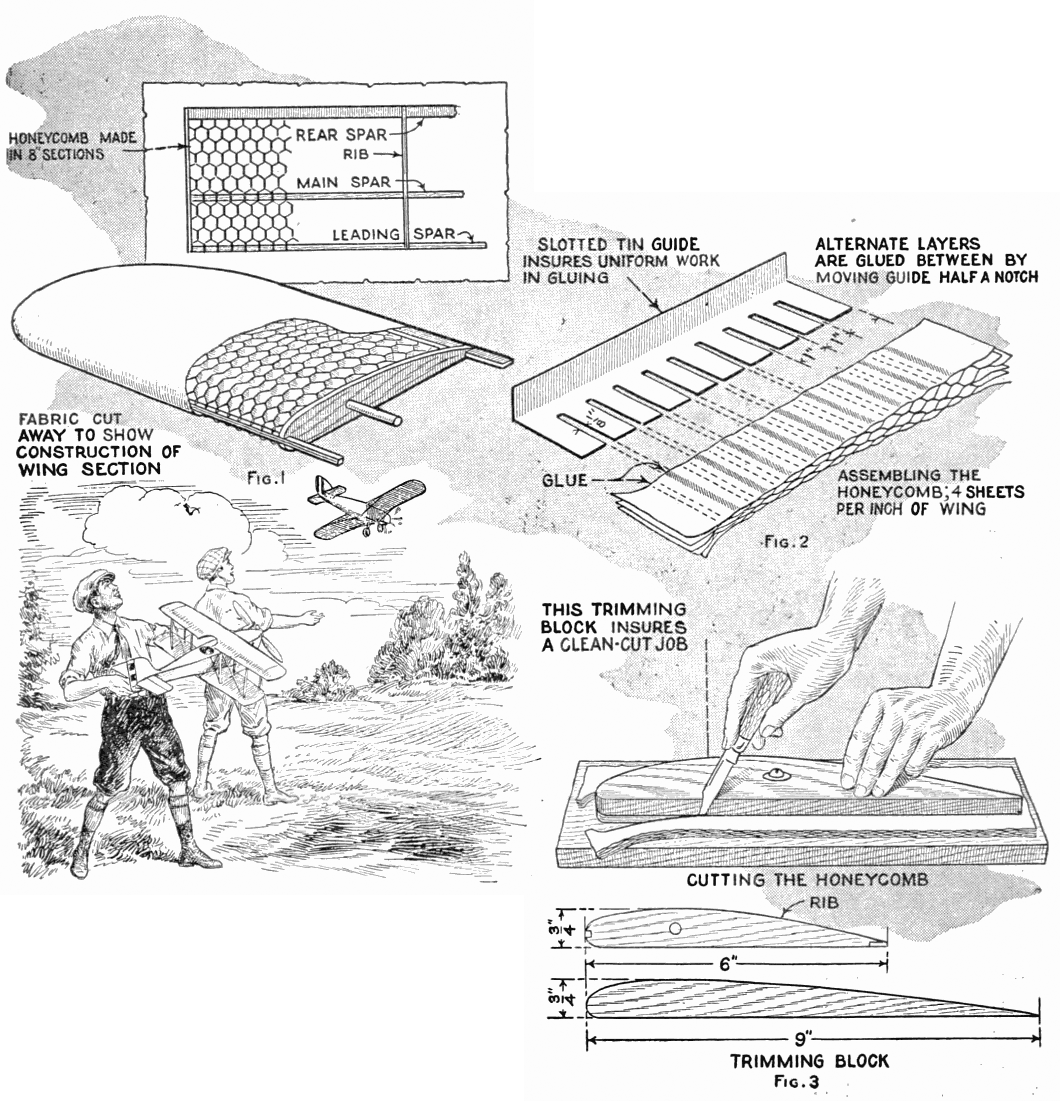
By building in a paper honeycomb, as shown in Fig. 1, the difficulty is entirely overcome, and a smooth, tight covering is assured for the life of the plane. Fewer ribs are required—spaced about 8 in. apart —and in patching torn fabric, the honeycomb permits pressing down on the patch. The cellular construction demands careful workmanship, but no more so than the multi-rib design. It is however best adapted to the larger models with wings of 5-in. chord by 30-in. span and up.
How to make a paper honeycomb for model building
First of all, bear in mind that this is not a quick job. The care you use in building up the honeycomb will be reflected in the smoothness of the wing. Most any light, thin and stiff paper will do for the cellular core, architects' tracing paper being particularly suitable.
For the purposes of illustration, we will assume that we are making a wing of 6-in. chord by 16 in. long (right wing only), of rectangular design. This will require three ribs, a round-section main spar, a leading spar, and a rear spar. White pine is recommended for the ribs, as well as spars, since it is stiffer than balsa wood. Plane the rib pieces down to 1/16-in. thickness, cut notches for front and rear spars and very carefully bore hole for the main spar.
Before starting the honeycomb, make a gluing guide, as shown in Fig. 2, either of tin or pasteboard. This insures uniform gluing, though after some practice one can glue better and faster freehand.
Cut out 32 strips of paper. 10 in. long by 1 ½-in. wide. This is just enough for one 8-in. section, there being four paper strips per inch of wing length. Cover strip No. 1 with the guide and glue through the slots. Use a small pointed brush, such as a water-color brush, and apply a this line of glue, just enough to stick securely. Too much glue will squeeze out over a larger area and affect the symmetry of the honeycomb.
Now lay paper strip No. 2 on this, and move your guide along half a space, so that the small notch in the guide will be even with the end of the paper strip, and apply the glue. The idea is to have the glue lines on each successive strip come between those on the sheet below. Press down on the glued portions every three or four strips. When the section of 32 sheets is completed, allow the glue to dry thoroughly.
Trimming the honeycomb is next. This is most easily accomplished by making a trimming block, Fig. 3, which can be screwed down on a flat board. The trimming block has the same shape as the rib, but is 1.5 times its length. For instance, the trimming block for the 6-in. rib should be 9 in. long, but the same depth, and the holes in both should be one-third the distance from the front. Sharpen your knife well.
Make a punch, the size of your main spar, by filing the end of a piece of tubing to a cutting edge. Punch holes in the honeycomb by laying the strips on a heavy block and driving the punch through with a hammer. See Fig. 4.
Having trimmed the honeycomb pad to the elongated rib shape, stretch it out gradually, a little at a time, until it will stay approximately in its final shape. Assemble the spars to the end rib, securing them with glue and pins, cut to about half their length, using the headless ends. Slip the honeycomb over the main spar and glue one end to the rib, holding it with paper clips. Fig. 5, until dry.
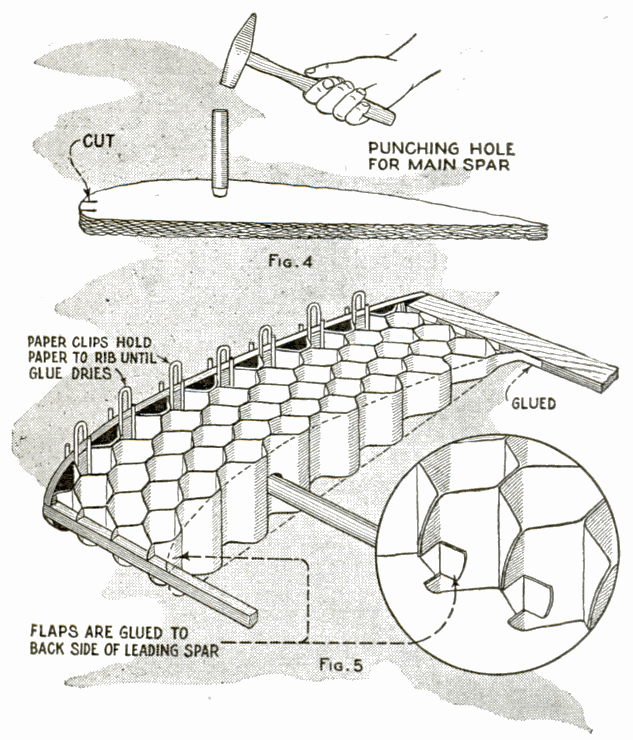
How to integrate the honeycomb in the structure of the wing
Next fasten another rib, 8 in, from the end. Glue the other end of the honeycomb to this. The front ends of the honeycomb are fitted over the leading spar and the flaps glued to the back of the spar. The rear tapering ends are folded at right angles and glued to the front edge of the rear spar. We repeat, patience will be required to do this well, but the results are worth all the pains you take. The same process is followed with the remaining sections.
With the honeycomb in position, firmly glued and dry, you can put on the fabric. Japanese rice paper is good material and easy to handle, and thin silk even better, if you know how to stretch it tightly. Glue your paper first to the front edge of the leading spar, pull firmly over the top surface and glue on underside of rear spar, as well as to the edges of the ribs.. drawing it tight on all sides. Glue the bottom surface to the bottom side of the rear spar. When completed, you will be pleasantly surprised at the smoothness and graceful contour of the wing.
The same construction can be applied to tapering wings, that is, those which have a narrower chord at the wing tip than at the body, by contorting the honey comb. This article however is not intended to illustrate the best proportions of the wings ; that depends entirely on the type of plane you are building. Here we are concerned only with the cellular construction.

Popular Mechanics - June 1929